基本的な使い方はチェックボックスと同じです。
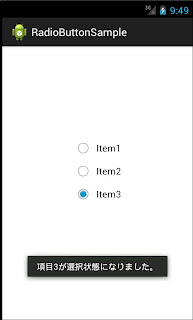
今回もラジオボタンがチェックされたときにメッセージを表示するサンプルを作ってみました。
まずはActivityにRadioGroupを配置し、子要素であるRadioButtonのonClick属性にオンクリックメソッドを設定します。
※RadioButtonをRadioGroup無しで配置することもできますが、その場合自前で排他処理を実装しなければなりません。
<RelativeLayout xmlns:android="http://schemas.android.com/apk/res/android"
    xmlns:tools="http://schemas.android.com/tools"
    android:layout_width="match_parent"
    android:layout_height="match_parent"
    android:paddingBottom="@dimen/activity_vertical_margin"
    android:paddingLeft="@dimen/activity_horizontal_margin"
    android:paddingRight="@dimen/activity_horizontal_margin"
    android:paddingTop="@dimen/activity_vertical_margin"
    tools:context=".MainActivity" >

    <RadioGroup
        android:id="@+id/rdoGroup"
        android:layout_width="wrap_content"
        android:layout_height="wrap_content"
        android:layout_alignParentTop="true"
        android:layout_centerHorizontal="true"
        android:layout_marginTop="136dp" >

        <RadioButton
            android:id="@+id/rdoItem1"
            android:layout_width="wrap_content"
            android:layout_height="wrap_content"
            android:checked="true"
            android:text="Item1"
            android:onClick="onRadioButtonClicked" />

        <RadioButton
            android:id="@+id/rdoItem2"
            android:layout_width="wrap_content"
            android:layout_height="wrap_content"
            android:text="Item2"
            android:onClick="onRadioButtonClicked" />

        <RadioButton
            android:id="@+id/rdoItem3"
            android:layout_width="wrap_content"
            android:layout_height="wrap_content"
            android:text="Item3"
            android:onClick="onRadioButtonClicked" />
    </RadioGroup>

</RelativeLayout>
次にActivityでオンクリックメソッドを実装します。
public void onRadioButtonClicked(View view) {
    // ラジオボタンの選択状態を取得
    RadioButton radioButton = (RadioButton) view;
    // getId()でラジオボタンを識別し、ラジオボタンごとの処理を行う
    boolean checked = radioButton.isChecked();
    switch (radioButton.getId()) {
        case R.id.rdoItem1:
            if (checked) {
                Toast.makeText(getApplicationContext(), "項目1が選択状態になりました。", Toast.LENGTH_SHORT).show();
            }
            break;
        case R.id.rdoItem2:
            if (checked) {
                Toast.makeText(getApplicationContext(), "項目2が選択状態になりました。", Toast.LENGTH_SHORT).show();
            }
            break;
        case R.id.rdoItem3:
            if (checked) {
                Toast.makeText(getApplicationContext(), "項目3が選択状態になりました。", Toast.LENGTH_SHORT).show();
            }
            break;
        default:
            break;
    }
}
こちらもチェックボックスと同じようにして選択状態とIDを取得できます。実際に動作させたときにキャプチャがこちら。


Item1を選択後、Item3を選択したときのキャプチャですが、Item3を選択したときにItem1の選択状態が自動で非選択になります。
0 件のコメント:
コメントを投稿